 Select Cut Order
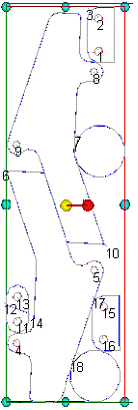
To use this function click the mouse on the first object to be cut and then click or drag mouse around the screen in the general order that you wish to process the parts. Right mouse click will show you a pop-up menu which enables you to Finish Cut Order or Cancel it. Cut ordering is a critical function as cutting away parts which link the rest of the job in place may cause instability and movement. Cut ordering is based on the position of the start points rather than on the centre points of shapes. Inner toolpaths will be ordered before their surrounding toolpaths if the hierarchy function has been applied to them.
Note: At times, a shape may have been negated, and then grouped with an outer shape and so appear to be hierarchied, but will be treated as separate shapes for the purpose of cut ordering.
Finish Cut Order
Will process the user defined cut order path and shows the cut order numbers.
Cancel
Cancels the cut ordering and switches ToolShop back to the main Mouse Selection mode.


Figure 53: User defined cut order path. Right mouse click and selecting “Finish Cut Order” menu option will process the user defined cut order path and shows the cut order numbers.
Automatic Cut Ordering
Columns
This function divides the job up into a set number of columns and will automatically order the parts up and down within these columns based on proximity of the start points to the column.

Figure 54: Automatic Cut Ordering dialog box when using the Columns option.
Rows
Ordering by rows will provide the job up into a set number of rows running horizontally across the job. The parts will be ordered across in a zigzag fashion according to their proximity to these lines.

Figure 55: Automatic Cut Ordering dialog box when using the Rows option.
Output to Machine
This is same as the File / Export function. Function opens a dialog box which enables you to export the toolpath to a NC file.
Clicking Save button when Save as type is “*.nc; *.cnc” will show an additional dialog which confirms the action from the user. You may export just the selected shapes by selecting “Selection”. If several sheets are defined, export “All sheets” can be selected.
The “Override cut order” option can be used to define the order in which tools are used or shapes are cut. Use “Up” and “Down” buttons to change your cut order preference and the tool order. The “Specific layers” option allows user to export only selected layers.
Clicking Cancel will return the Export dialog box where the directory or the file name can be altered
Note: The “Override cut order” and “Specific layers” options can be also accessed from the “Options / Preferences” menu.

Figure 56: Exporting 3 nested and toolpathed sheets to machine files. User is asked to confirm the action.
Note: Output to Machine will export empty sheets as empty NC files.


